|
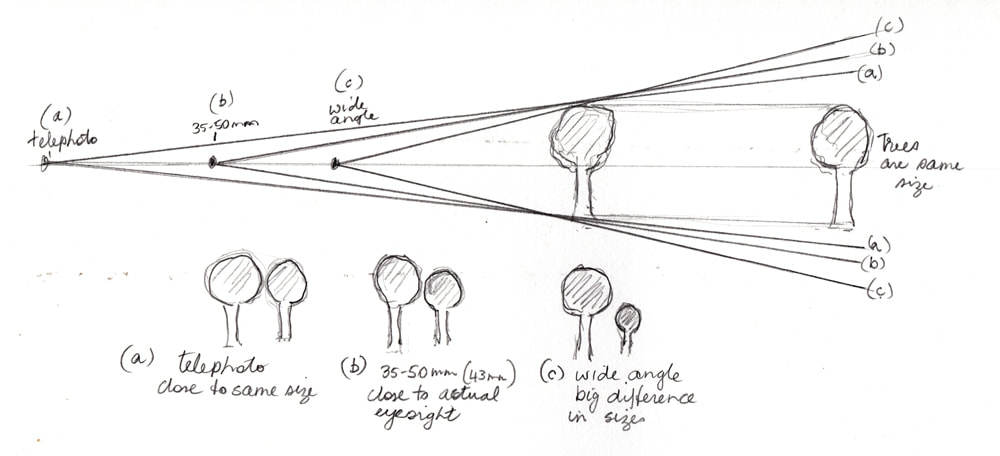
It is no surprise that our eyes see differently to a camera. There are differences between cameras and lenses as well - DSLR, compact, mirrorless, bridge, smart phone, iPad, wide angle, telephoto etc. Even people see things differently to each other - shapes and angles that make up each person's eyes can differ and brain interpretations can differ. I am not qualified to explain the technical aspects of these differences. There is plenty of material online that discusses these things, if you would like to find out more. Our dear friend, Google, will help you out. While it may be preferable to draw from real life, it is not always possible - weather, health and various other factors can force us indoors to rely on photos as our source (your own photos unless you have permission to use somebody else's images). For one of my drawings (many years ago), I stood in the middle of a busy street to get photos of a building from my chosen aspect. It was no place to set up and draw on location - too dangerous. It was scary enough getting the photos. Using photos to draw/paint landscapes generally presents few problems especially if the photo is used merely as an 'idea' from which to develop an artwork. Drawing buildings from photos is not as straight forward as you generally want the drawing to be a believable representation of the actual building. If you are an accomplished photographer your photos of buildings are probably fine to use as they are. However, many of us are not accomplished photographers and our photos of buildings show obvious distortions and also loss of detail in the shadows. To give some idea of distortions that can occur let us look at wide angle, telephoto and 43mm (35 - 50mm) lens settings (43mm is closest to our eyes according to several online sources). Compared to viewing objects with our own eyes:
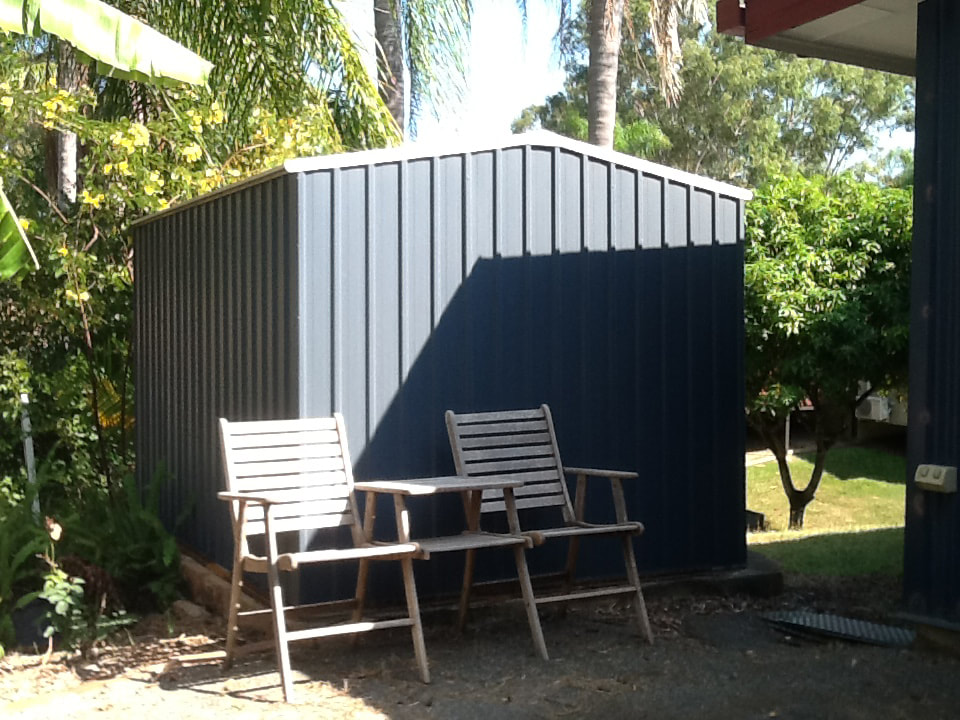
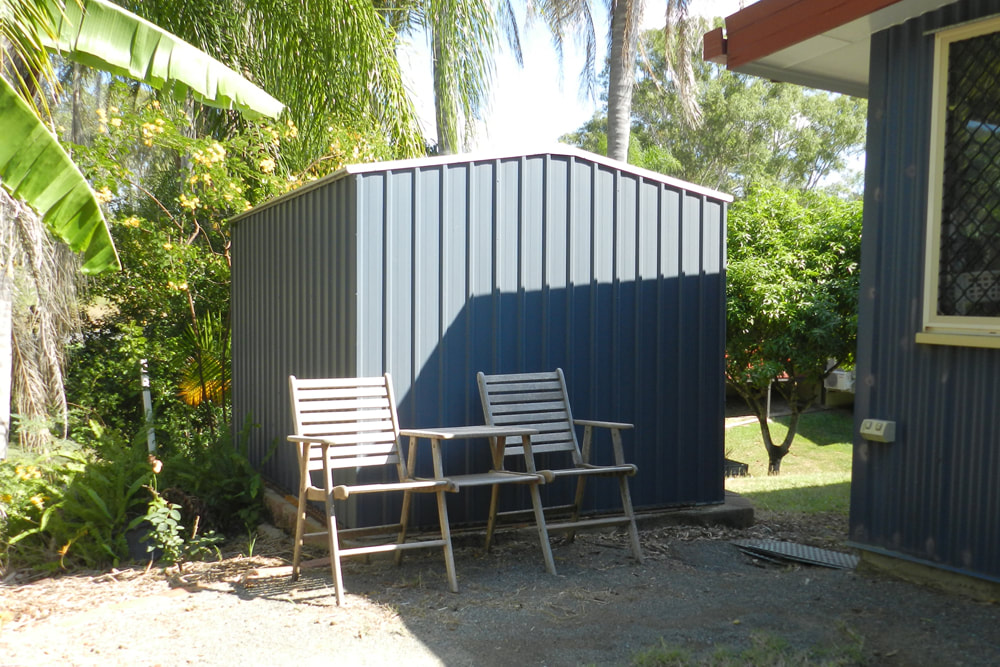
 There are other distortions that occur such as barrel, pin cushion and convergence. These are common distortions when photographing buildings, built structures or even tall trees. These distortions relate to how the camera 'sees' perspective when various lenses/settings are used as well as the angle of the camera to the object - e.g. pointing the camera skywards to capture a tall building. The barrel distortion and convergence are often the result of using wide angle while pin cushion is usually related to telephoto when photographing nearby structures that are taller than the photographer's viewpoint. 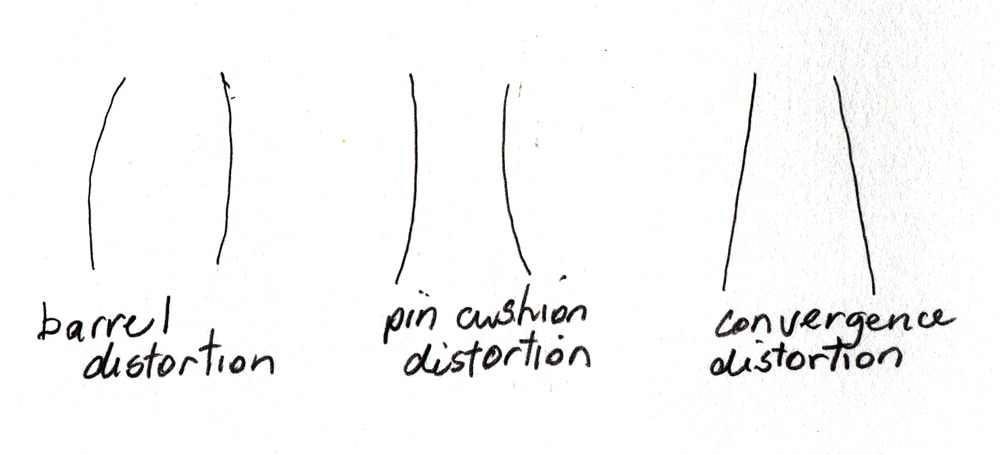 Another major difference is loss of detail in the shadows of photographs. Our eyes can adjust to light and shade differences better than a camera. In particular, we see more light and detail in the shadows while cameras often read shadows as solid, dark masses with little or no detail. When using a photo of subject matter that shows dark shadows it is worth increasing the lightness/ fill light of the photo, with photo editing software on your computer, to bring out hidden detail in the shadows - only use that adjusted photo for detailing the dark areas - refer to your main photo for everything else. Now for a practical example. I drew a small scene, on location, outside of my studio. It includes a small shed, seating and part of my studio. I took particular care to measure the main lines and angles and to then place everything else in comparison to these initial structured lines and marks. This way, I recorded accurately (or at least, close to accurately) what I saw. At the start of drawing, I took a photo with my iPad and at the end of drawing I took a photo with my bridge camera (note that the shadows had shifted by then). Both photos were taken using default settings.
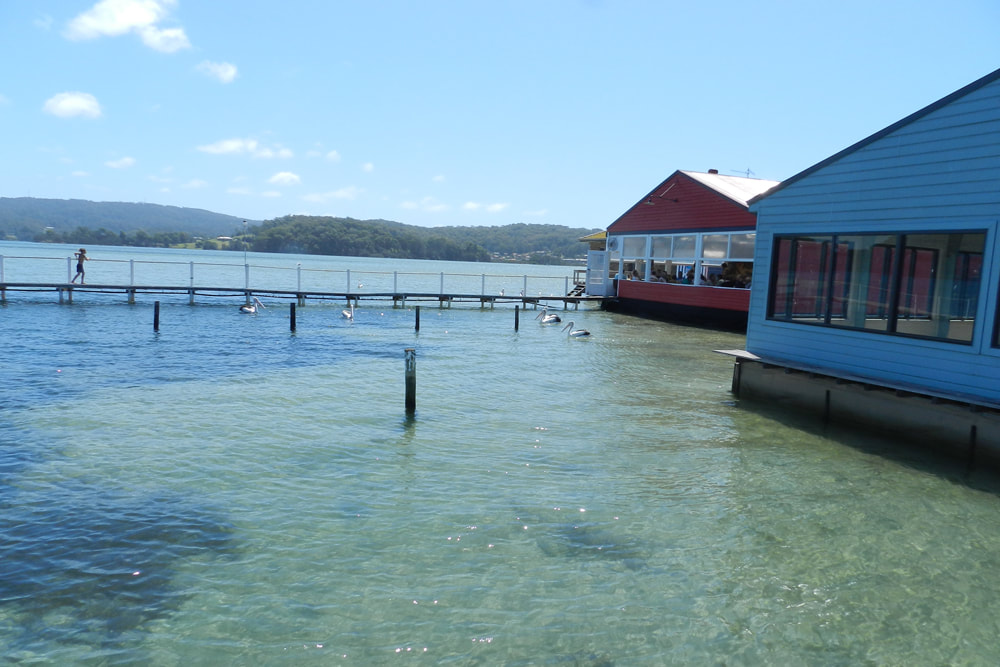
Each of these versions is different. Note the sloping wall of the studio in the photos, a result of convergence distortion. The placement of the seating was so different to my drawing that I questioned my drawing's accuracy. I returned to my drawing spot but found no issues with my drawing of the seating in relation to the shed. The camera versions had overstated the scale of the seating and had it projecting further forward from the shed than was the case (distortion of perspective). I also found that the camera versions had aligned the edges of the seating and its cross bars with different markers on the shed - e.g. the vertical v protrusions of the aluminium cladding and the concrete and block base. This is a distortion caused by the camera having one focussed 'eye' compared to my two movable eyes. The accompanying photos of the shed, the drawing and overlaid images of shed and drawing demonstrate the differences. 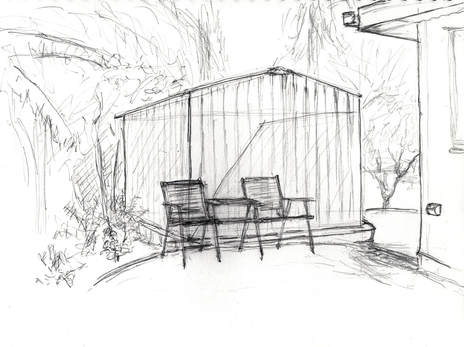 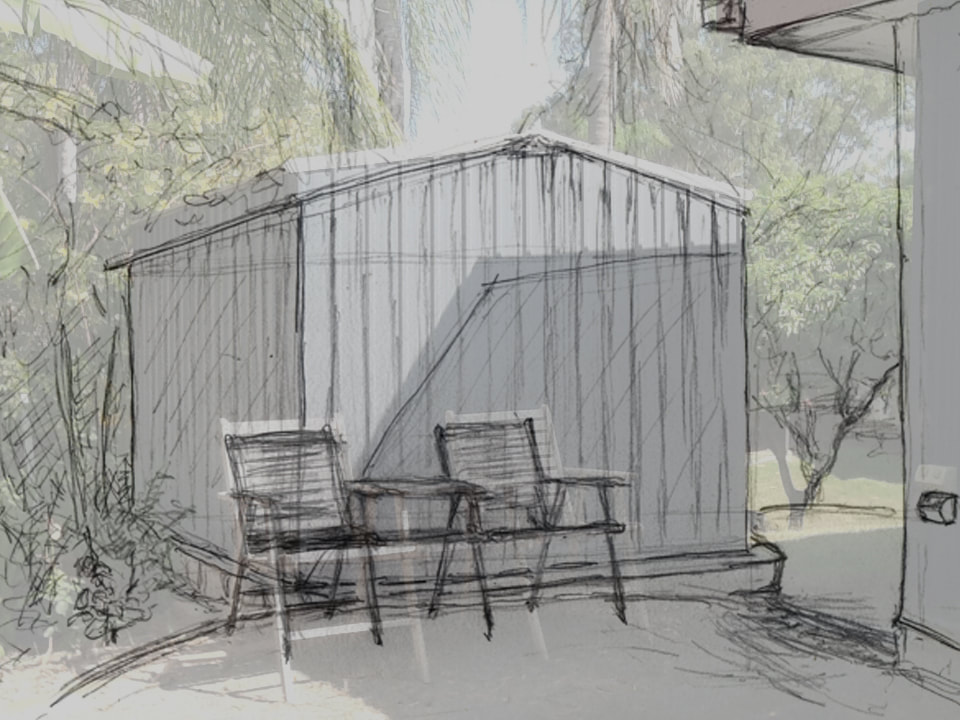 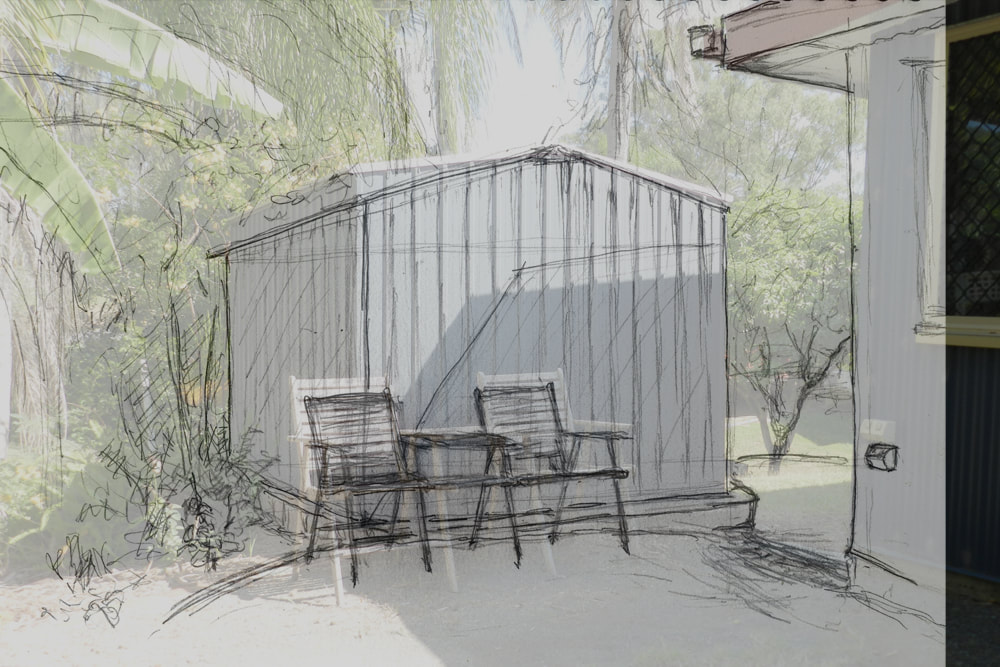 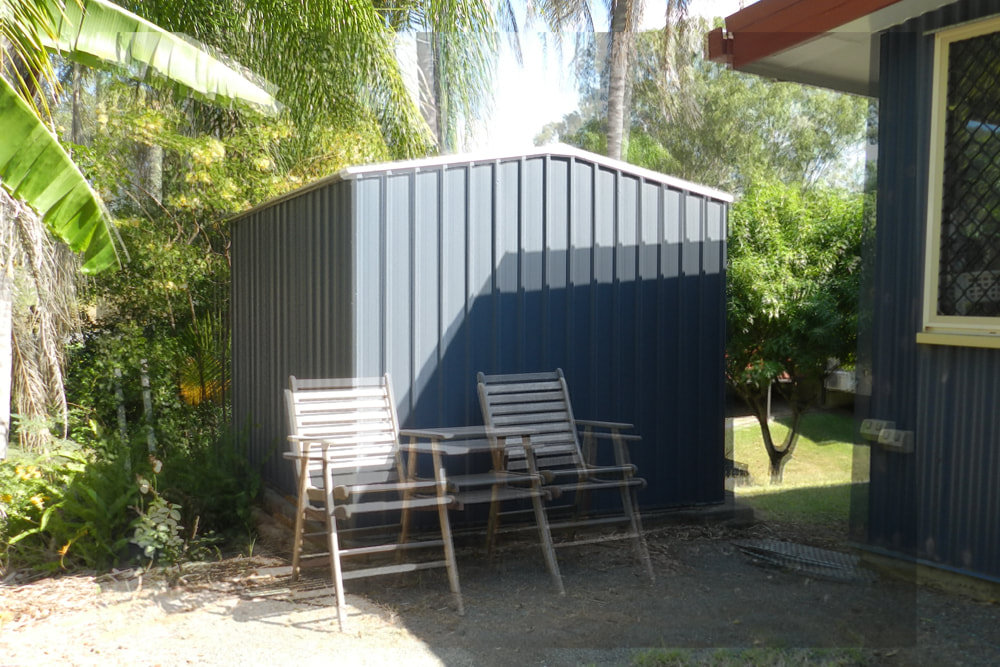 Left - overlay of drawing on iPad photo : Middle - overlay of drawing on bridge camera photo: Right - overlay of iPad on bridge camera photos Now, let us use a photo in isolation from the actual scene. I am using one of my travel photos taken at Narooma, NSW. To start with I needed to straighten the photo - I have a terrible habit of taking slanted photos even when I try hard not to. This can be done with photo editing software/ap. Then, it is obvious that the front building (closest to me when taking the photo) suffers from convergence distortion.
. A correction is needed when drawing it. This involves straightening the sloping wall as well as altering the angles of the roof, windows and base of the building. As the building was not far from me, I needed to ensure that the perspective is not overstated and that the roof appears higher at the highest point - cameras can compress perspective in some instances. I leave the further building as it is. It reads well in the photo. The left end of the jetty was actually a lot closer to me than the far, red building so I angled it more towards the viewer and gave it more distinct perspective. Another adjustment was shifting the child further into the picture rather than near the edge. The child was made larger in keeping with the increased perspective of the jetty. I paid little attention to the precise location of the pelicans and posts - just positioned them according to their pattern in the photo but where I felt they looked effective (not everything need to be accurately recorded). 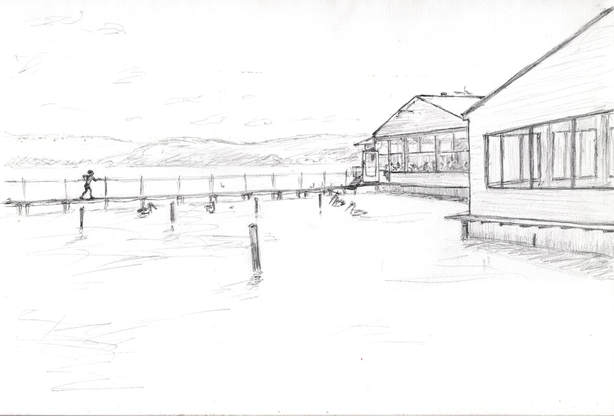 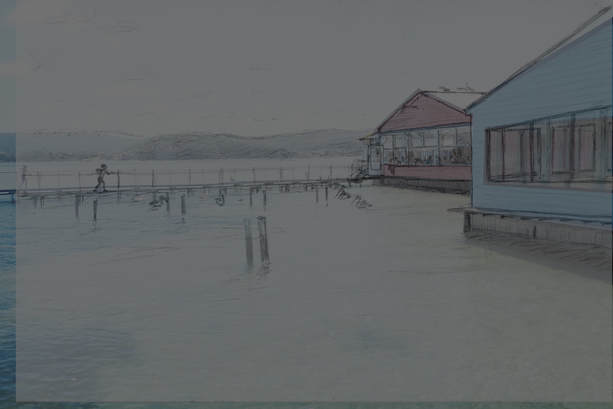 Top - The drawing: Bottom - on overlay of the drawing on the photo - Note: it is difficult to see that the drawing has removed the slope of the blue building wall in this overlay. The base of the drawn line is slightly right of the edge of the blue wall and the top is slightly left of the edge of the blue wall. While a drawing using a photographic source may not reflect what would be drawn on location, it more accurately expresses the scene than the original photo. A viewer would accept it as a realistic representation of the actual scene. I did not become involved in careful detail in this drawing. However, if I were to continue further I would start looking closer at the detail in the shadows - the people in the restaurant - the shadows at the base of the buildings. The accompanying image shows an increase in fill light to bring some detail out of the shadows. 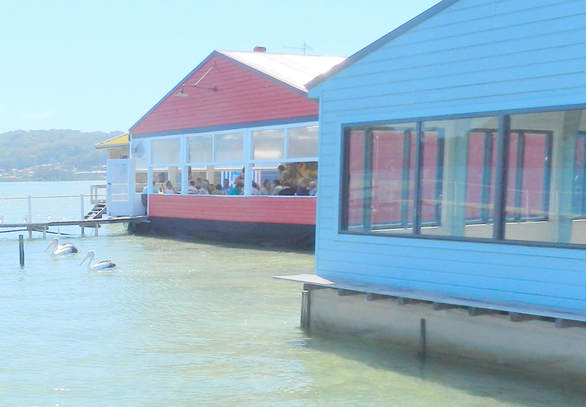 Sometimes, the distorted perspective or heavy shadows create a really interesting image. Don't be afraid to cash in on the wow factors that these distortions may present. While ignoring a certain amount of accuracy and detail it is still possible to create a dynamic, believable drawing/ painting utilising interesting effects of perspective and light and shade. Remember, it is your drawing. You make it say what you want it to say.
Until next time Anne |